If your Epson printer stopped printing due to Ink Waste Pad being full, your printer has reached the limit of print jobs that it can perform. The length of time a printer can be used varies depending on the model, amount and type of pages printed. Don’t worry, this is a common problem in Epson printers and it is set to shut down the printer for maintenance. You would know this the next time you can’t perform a print job and the warning light in your printer flashes and a dialog box or message appears in your computer that says:
“A printer ink pad is at the end of its service. Please contact Epson support.”
It’s time to reset your Epson printer ink pad to continue its serviceable life. You just need to download a specific software and perform a short process to solve this problem.
But first, what causes the Epson Waste Pad Error to Occur?
Epson printers use some kind of waste pad / Epson printer ink pad which is situated underneath the print head. The waste pad is basically a large foam sponge sitting inside of a plastic container and it absorbs all of the wasted ink which gets pumped through the printer. During a print head cleaning cycle large amounts of ink get pumped through the print head and deposited straight onto the ink waste pad. This automatic cleaning cycle occurs almost every time you turn your printer ON and it’s purpose is to keep the microscopic holes in the print head clear of dried ink. Epson Printers use a piezo print head which can clog quite easily if this cleaning process doesn’t occur often enough. (Source: Epson)
How to Reset an Epson Printer for FREE?
- Look for your Epson printer model below and click on the corresponding Epson Printer Resetter Tool download Link. You can download the software via Google Drive for FREE. Unpack or Unzip the downloaded Epson Printer Resetter files.
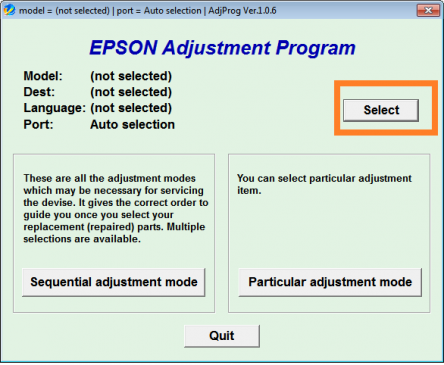
- From the unzipped Epson Resetter Tool files, look for the Epson Adjustment Program named AdjProg.exe file. Double click it to get to the screen as shown below then click “Select”.
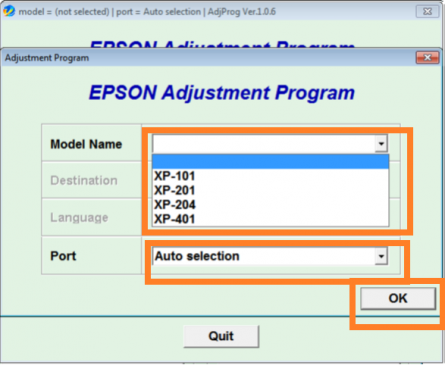
- Another dialog box will appear. Select your printer on “Model Name”. Leave the Port as “Auto selection” then click “OK”.
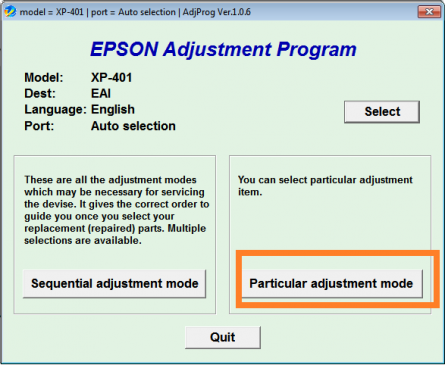
- The dialog box will close. In the first dialog box, Click on the “Particular adjustment mode” button.
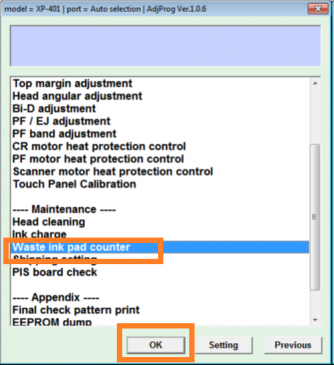
- Another window will open. Select the option “Waste ink pad counter” then click “OK”.
- Another window will appear. Click / Tick both boxes of ( Main pad counter, Platen pad counter ). Then click “Check”

- You would notice that values were filled-up in the % and point boxes. Click / Tick both boxes again (Main pad counter, Platen pad counter ). Click “Initialization”.
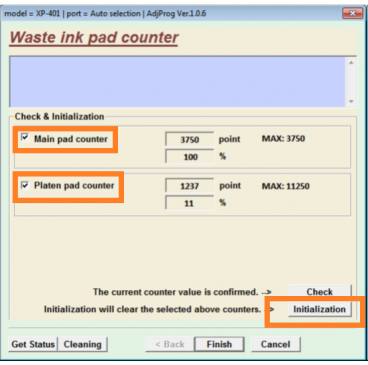
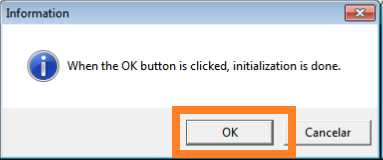
- Click “OK” to reset the Waste ink pad counter.
- Now you have to switch the printer OFF and then ON again.
Congratulations. Your printer has been reset and can now be used again. You can follow these instructions next time you encounter the same problem again. If you encounter a different problem, comment below or join the discussion in our Facebook Group for more insights.
All files from DepEdClub.com are FREE for everyone. Thank you. Please Share.
Epson Resetter Tools
- Epson Resetter Tool for Epson Printer Models: L110, L210, L300, L350, L355, etc.
- Epson Resetter Tool for Epson Printer Models: ME 320, TX121, etc.
Your website is really the best. Thanks DTC!
I am happy that I found this website, precisely the right info that I was searching for! organized and accurate too!